Wednesday, August 24, 2016

Version incompatible error during OVM installation

Task : To Install Oracle OVM 3.3.1 in Oracle Linux 6.8

Issue : Unable to install and shows version not compatible.


 Solution : Rename the file /etc/oracle-release to /etc/tmp_oracle-release_bkup. Rerun the installation and it should be working.

Wednesday, December 23, 2015

Problem on installing Oracle product in Linux through GUI

When installing Oracle Database/JDE/Server Manager in Linux GUI mode using Oracle account, the following error occur.

To rectify the issue:
  1. login to the Linux console with root account
  2. type in DISPLAY=:0.0
  3. type in export DISPLAY
  4. type in xhost +
  5. login to oracle account su - oracle
  6. type in DISPLAY=:0.0
  7. type in export DISPLAY
  8. type xclock and see if the previous said error still appears or not. 
  9. if a clock appears that means configuration is done. 
  10. You may proceed to install using oracle account in Linux. 

Install GUI in Oracle JD Edwards 9.1.4.4 VM Templates Servers

1.   Issue following command to install the GNOME and X system.

      [root@E1SVR ~]# yum -y groupinstall "X Window System"
      [root@E1SVR ~]# yum -y groupinstall "GONE Desktop Environment"

2.   Reboot server.

3.   Start GUI with the following command

      [root@E1SVR ~]# init 5

Monday, October 5, 2015

Orphan Shared Drives Removal

Problem :

When accessing Windows network drive, it did not ask for login and straight away display a pop out stating that you do not have permission to access the drive. Please contact administrator.

Solutions :

  1. Navigate to the HKEY_LOCAL_MACHINE\SYSTEM\MountedDevices section of the Windows registry.
  2. Locate the mapped network drive that you want to clear. Each drive will have a registry entry labeled as "\DosDevices\" followed by the letter assigned to it.
  3. Right-click on the drive entry and select the "Delete" option from the contextual menu, then confirm your decision to remove the mapped drive letter assignment.
  4. Restart your Computer to reread the Registry.

Configuring Test mail in Microsoft Windows Powershell

By Modifying the script to your preferences, a test mail can be send from Windows PowerShell

$EmailFrom = “esmondeyong@gmail.com”
$EmailTo = “admin@titanfour.com.my”
$Subject = “Sent from PC PowerShell”
$Body = “What do you want your email to say”
$SMTPServer = “smtp.gmail.com”
$SMTPClient = New-Object Net.Mail.SmtpClient($SmtpServer, 587)
$SMTPClient.EnableSsl = $true
$SMTPClient.Credentials = New-Object System.Net.NetworkCredential(“username”, “password”);
$SMTPClient.Send($EmailFrom, $EmailTo, $Subject, $Body)

  • $EmailFrom = Sender's Email address.
  • $EmailTo = Recipient’s Email address.
  • $Subject = The subject for the Email that you want to send.
  • $Body = Content for the Email.
  • $SMTPServer = Your email SMTP Server
Change the following under $SMTPCleint.Credentials

  • username = Email username
  • password = Email password

Wednesday, February 11, 2015

Add RSA authentication for Oracle VM JDE Template Servers

Tools needed:
PuTTY (Download)
PuTTY Key Generator (Download)

1. Open PuTTY Key Generator, click on the Generate button.

2. Move the mouse cursor around until the Key generation bar is filled up.

3. After finished generating the key, you should be able to see something as follow:

4. Save both Public Key and Private Key in a location that you are familiar with. 

5. Copy the Public key phrase. Make sure it is in a line.

Example: 
ssh-rsa AAAAB3NzaC1yc2EAAAABJQAAAQEAghxBZAfgU277+6H0qo95siux76T3CTP+25LOzxQdYRl8X+DsaPf8F8pMNM0CCjF4wBIFGmVBzFCwANtIpmkt2G7fib9ckjHT9FfQhydQeMQQZ+SmQeD2imOj4S+FRLzQg5Et/wixr7WXAybJzpBa1UrJ+u7izC3y7+/20RtlzIrEf5MmEOqvYIFpQn0n+pCweCHo1haYPeXMOYpda7Xwd2CAEUk/sq/dqGLJwHVtuB4sr3mTv/7wXvhAMgJxgId6vFh2G8sw6x+f+cuLd/oJxLILilugw1QxhrbtsDtENhM1AP9ms26LHkAmczFM9/JdMV0pobeLXNLULxlO1SPwlw== rsa-key-20150211

6. Open PuTTY.exe and login to target server which you want to use RSA Authentication.


7. Once login, make sure you are on the root home folder (/root). Enter the following command line by line:

# mkdir .ssh   
# chmod 700 .ssh
# cd .ssh
# vi authorized_keys

Paste the public-key copied from step 5 and save the file by click on esc key from the keyboard and then type :wq

8. Open PuTTY.exe again. 
For Host Name, type in the root@[server IP address]. Put a name of your preference in the Saved Sessions text box. 

9. From the left panel, Click on Connection -> SSH -> Auth. Click Browse, navigate to the location where the private key is saved from Step 4.

10. Once the private key is added, go back to Session, make sure the hostname and saved sessions is correct. Then click on the Button Save.

11. To test that the configuration is correct, select TESTSERVER and click the Open button. 

12. You should see the screen similar like below if it is successful. 


Friday, October 4, 2013

Steps on how to change JDE Administrator password


1 Stop EnterpriseOne services and JAS Server instances

2 Change the database user password.

alter user user_name identified by new_password;

For this case it will be:

alter user jde identified by your_password;

3 Disable Security Server in the server JDE.INI file by adding “;” in front of SecurityServer as shown below:

[SECURITY]

;SecurityServer=

4 Disable Security Server in the client JDE.INI file. Use 1 machine to apply these changes.

5 Login to the workstation with the new jde user account.

6 Open P98OWSEC

7 (Optional)Change the Proxy User password. The new password entered should be the same case as the database login password.

8 Change the System user password. (Steps are shown below)

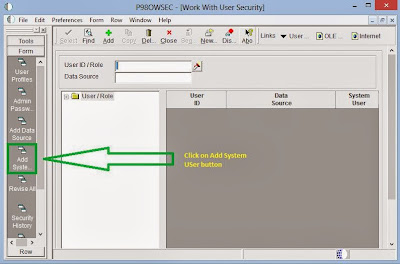
I. From P98OWSEC, click on Add System User


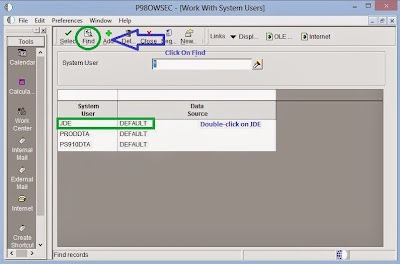
II. Under Work with System Users screen, click Find and double-click on JDE.


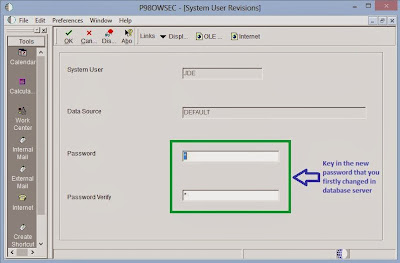
III. Key in and verify the new password that you have firstly set in the Database Server. Click OK.


9 Change the JDE Login password for Fat Client login also. The steps are shown below:

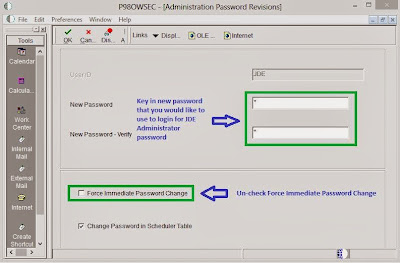
I. In P98OWSEC, Search for JDE user ID, and click on Admin Password Revis button in the exit bar on the left.
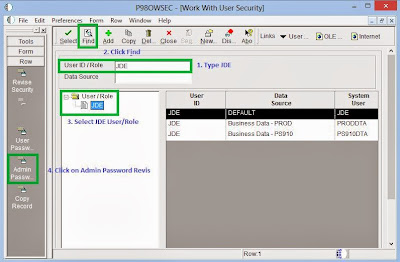


II. Type in new JDE login password, it can be same as the Database password you changed from the beginning or you can have a different password. Click OK.


10 Logout of workstation

11 Update the fat client and Enterprise server JDE.INI files with the new password in [DB SYSTEM SETTINGS] and [SECURITY] sections. Ensure password case accuracy.

12 On JAS(web) server, change the JDBJ.INI files with new password for all environment.

13 Run PORTTEST with the new system user and password

14 Enable Security Server in client and server JDE.INI files.

15 Start E1 service(s). If using multiple servers (logic, enterprise), start services on the server designated as the primary Security Server.

16 Submit a UBE to the server. This will ensure connectivity to the database.

17 Have HTML users login and also submit a UBE to the server.


Reference : E1: SEC: Frequently Asked Questions on the JDE User ID and Password (Doc ID 1261994.1)